Introduction
In this piece we’re going to cover some simplified physics that might help improve your understanding of a few components of lifting. Namely, we’re going to cover a few different biomechanics terms and how they can affect your ability to perform a certain lift – plus, how you might be able to optimize this knowledge to improve your strength gains.
Alright, get your calculators out and let’s get started.
Forces
I think just about everyone knows the classic F = ma formula, in which force is the product of mass multiplied by acceleration. When it comes to lifting, we can think of the barbell as the mass, and gravity as the acceleration. With this in mind, let’s say you’ve just un-racked a 100kg (220lbs) barbell and are prepared to squat. This means we’d multiply 100kg x 9.8m/s2 (acceleration due to gravity) to find how much force we have to overcome to squat this weight. In this scenario, we’d have to overcome 980 Newtons. But wait, it gets even more fun in the next section.
External Moments
Simply standing there with a 100kg barbell on your back results in the barbell exerting 980 Newtons of force on you. However, as you descend into a squat, this force turns into an external moment at various joints (namely the ankle, knee, hip, and intervertebral joints in a squat). An external moment is calculated by multiplying the force (980 N) by the horizontal distance (measured in meters) that the force is applied relative to a joint. Since gravity is always accelerating straight down, you can draw a line straight up from the center of mass of the system (you + the weight – usually from the middle of your foot in a squat) and intersect it with a horizontal line coming from the joint in question.
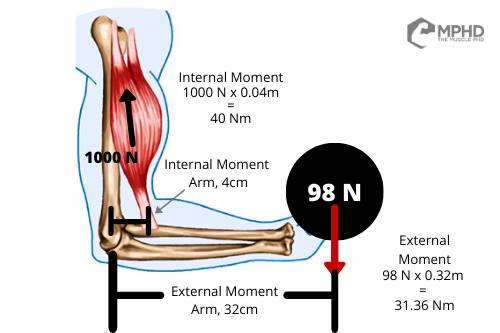 An external moment is probably easier to visualize by imagining a dumbbell curl. Let’s say you’re curling a 10kg dumbbell (22lbs) and the distance between the dumbbell and your elbow is 32cm. Why the elbow? Because that’s the primary joint involved in the movement, and it’s the joint that the prime mover muscle(s) is(are) acting on – in this case it’d be the biceps brachii, brachialis, and to a lesser degree, the brachioradialis. Let’s imagine you’re in the middle of a curl where your forearm is perfectly parallel to the ground – now we can find the external moment that the weight is exerting on your elbow. First, we find the external force (10kg x 9.8m/s2) to be 98 N. Now, we multiply 98 N by 0.32m to find an external moment of 31.36 Nm.
So, what does this mean? In this specific position of a dumbbell biceps curl, your biceps will have to produce an internal moment greater than 31.36 Nm in order to lift the weight. So, how do we calculate that?
Internal Moments
An internal moment is simply the force that a muscle exerts on a joint in order to cause rotation about the joint axis – in the curling scenario, it would be flexion of the elbow. An internal moment is also calculated as force x horizontal distance; however, the force is dependent on the total muscle force whereas the horizontal distance (internal moment arm) is the distance between the joint and the muscle attachment.
Let’s isolate this example to just the biceps brachii to keep things simple. The biceps brachii attach on the radial tuberosity and typically this attachment is about 4cm from the elbow joint (axis of rotation). So, if for instance, the biceps were able to produce 1000 N of force, we would multiply 1000 N x 0.04m to find an internal moment of 40 Nm. AKA, you’ll be able to lift the weight in this position IF you produce at least ~785 N of force as that will overcome the external moment of 31.36 Nm.
Now, obviously, you have multiple muscles acting on the elbow during a biceps curl, each with a different attachment point, a different fascicle angle, and a different mechanical advantage at various points of the curl. I don’t think anyone is interested in calculating that many different items – especially for each degree of flexion as we move throughout the range of motion in a dumbbell curl. Just know that it’s a lot of math but it absolutely helps uncover what portions of exercises are (theoretically) most effective for developing certain muscles.
Relation to Training
So, now that we have a good understanding of these items, how does this relate to training? If we take the biceps curl example, it’s easy to see that the horizontal distance between the weight and the elbow is greatest when the forearm is parallel to the ground. Therefore, this is the position in which the external moment (an extensor moment, in this case) is the greatest and requires the most muscle force to overcome (because you can’t change your attachment points at will, sorry). In layman’s terms, we call this a “sticking point.”
The sticking point of a lift is usually a position in which the weight has the greatest mechanical advantage over you – i.e. the position in which the external moment is the highest. This position can also be dependent on the length-tension relationship of the muscles involved in the movement, but again, that comment only serves to muddy things up so let’s keep it simple and move on.
Deadlift Example
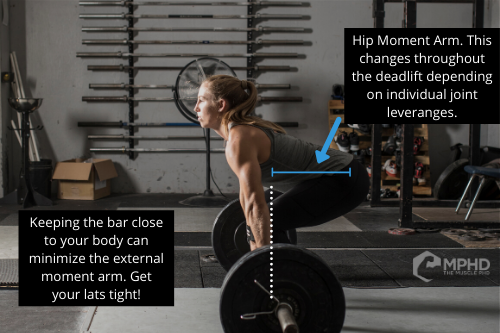
With sticking points in mind, let’s touch on the deadlift. Sticking points in the deadlift are highly dependent on individual biomechanics and joint leverages. Why? Because the sticking point is going to be the position in which the barbell exerts the highest external moment. Since the hip is the prime mover joint in a deadlift, wherever the barbell is furthest away from the hip during a deadlift is going to be the most difficult part of the lift. For some people, this is when the barbell is on the ground, while for others, this is while the barbell is just under the knee cap.
 What does this mean for training? First, pick a day and max on your deadlift. Where’s your sticking point at? Once you find this position, you know you have to train specific movements to get stronger in this position – therefore, you can increase the internal moment (muscle force) to overcome the external moment at this specific joint angle. For me, I always stalled my deadlift around my kneecap – I actually can stiff leg deadlift and deficit deadlift nearly as much as my normal deadlift since I have no problem getting the weight off the ground. So, to increase my deadlift, I had to do a ton of block pulls, rack pulls, RDLs, and other deadlift variations with the barbell around my kneecap. I had always been a terrible deadlifter all though college, but once I figured out my weakness in grad school, I was able to increase my 1RM from ~485lbs to 600lbs in about 8 months.
Squat Example
The squat is a little harder to visualize (that’s why we made the example), but typically, your sticking point is usually at the very bottom, or just above parallel (about 90-degrees of knee flexion). Most people will get enough rebound to get out of the hole of a squat, but they’ll often get stuck just above parallel. Again, why is this the case? This is simply the position in which the weight is exerting its highest external moment – the horizontal distance between the knee and the weight is usually greatest right above 90-degrees of knee flexion. This is one factor that can lead to people leaning forward as they fatigue in a squat or attempt a max squat. This helps get the bar closer to the knee joint and forces the lifter to rely more on their posterior chain and adductors to finish the lift.
While we could go a similar route like we did with deadlifts on this, I’d like to take a different (and more appealing) route for bodybuilders. Remember, the greater the external moment is, the higher the required internal moment (muscle force) to overcome the weight. How do we increase muscle force? You simply increase muscle activation (we’ll forego the force-velocity curve for now). Why is this important? The more fibers that are active in an exercise means that you’ll get a better growth stimulus out of the exercise (assuming you do appropriate volume, etc.).
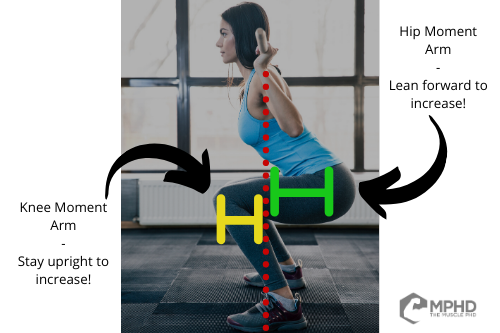 So, what does this mean for squats? Well, what’s your goal with squats? Increased quad size? Glute size? Now you can modify your squatting form to emphasize one joint over the other. Want to activate your quads more? Try to squat with a more upright stance to increase the external moment at the knee. This would include strategies like narrowing your stance (to a degree), wearing weightlifting shoes, or placing your heels on a weight plate to elevate them. Hack squats and front squats will also reinforce this position which is why many lifters use these options for quad building. If you’re trying to emphasize your glutes, try the exact opposite. Squatting with a wider stance will force you to lean forward more, reducing the external moment at the knee and increasing it at the hip (this also involves hip abduction and external rotation, outside the scope of this piece).
One last thing to note, just to make things more complex, is that the squat involves some abduction and external rotation at the hip. With this in mind, this renders the femur not quite perfectly parallel to the “normal” sagittal plane – a true sagittal plane in this instance would run through the femur, rather than the torso. Looking at the external moments from just a side view (torso sagittal plane) only offers a small understanding of these moments – you need to consider the movement in a 3-D plane rather than a single plane. But, that’s outside the scope of this piece and only serves to appease the physics/biomechanics nerds whom are foaming at the mouth while reading this simplified version of things.
Conclusion and Takeaways
Realistically, you can use this knowledge to emphasize just about any muscle group in a given compound movement. Why does a wide grip bench feel like a better chest workout than a close grip bench? A greater external moment arm at the shoulder.
Furthermore, these concepts also represent one (of many) reasons why the calves are so hard to build. Literally no exercise can get a great mechanical advantage over the calves as the ankle functions as an incredibly efficient lever system (Class 2). You best bet is to try to get as great a stretch as possible in every movement as that’s (typically) a novel loaded range of motion for the calves.
If you have any questions about a particular exercise, simply film it and assess the external moments that the weight is inducing on the joints involved. How can you modify this movement to emphasize one joint over the other? These changes may be very minor, but they could add up to significant gains over time.
If you’re a powerlifter, film your lifts and see where your weak points are. Is there a technique change you can employ to reduce this weak point – i.e. getting your lats tighter to keep the bar closer to the hip during the deadlift? Once you fix the technique, figure out where your sticking points are and add specific exercises to train those joint angles to better overcome that position. This is a massive component of conjugate/Westside-style training and is likely one large reason for the success of these training styles in powerlifting.
As always, knowledge is power!
From being a mediocre athlete, to professional powerlifter and strength coach, and now to researcher and writer, Charlie combines education and experience in the effort to help Bridge the Gap Between Science and Application. Charlie performs double duty by being the Content Manager for The Muscle PhD as well as the Director of Human Performance at the Applied Science and Performance Institute in Tampa, FL. To appease the nerds, Charlie is a PhD candidate in Human Performance with a master’s degree in Kinesiology and a bachelor’s degree in Exercise Science. For more alphabet soup, Charlie is also a Certified Strength and Conditioning Specialist (CSCS), an ACSM-certified Exercise Physiologist (ACSM-EP), and a USA Weightlifting-certified performance coach (USAW).
